
Grout saw carbide blade performance usually comes down to two things: matching the blade to the grout you have, and using a technique that lets the carbide do the work instead of forcing it. If you have ever started a “quick touch-up” and ended up with chipped tile edges, a clogged blade, or sore wrists, you are not alone.
Grout removal looks simple until you hit real-world variables, old sanded grout, tight corners, hairline joints, soft wall tile, or a shower where everything is damp and gritty. A carbide blade can be a workhorse, but it is not magic, it needs the right pressure, angle, and sometimes a different tool entirely.
This guide breaks down why carbide blades work well on many grout types, how to tell when they will struggle, and what to do so you get clean joints without damaging tile. You will also see a quick comparison table, a practical checklist, and a few “don’t do this” moments that save time.
Why carbide blades are popular for grout removal (and when they are not)
A carbide grit or carbide-tooth edge is tough and abrasion-resistant, so it can shave grout even after the edge starts to look “dull.” For many DIY repairs, that durability matters more than speed.
- Great for small to medium repairs where you want control, like a few feet of cracked grout in a shower corner.
- Better feedback than power tools, so you can feel when you are drifting toward tile.
- Less dust and noise compared with oscillating tools, although you still want a mask and containment.
But reality: some grout is simply stubborn. Older sanded grout can be rock-hard, epoxy grout can be its own category of frustration, and very narrow joints can make a thick blade scrape tile before it bites grout.
According to OSHA, silica dust from cutting or disturbing grout and tile materials can be hazardous, so dust control and respiratory protection are worth taking seriously even on “small” jobs.
Common reasons a grout saw carbide blade feels like it is not working
If your grout saw carbide blade seems to skid, clog, or take forever, it usually is one of these patterns, and the fix is often simple.
1) The grout type is working against you
Sanded grout contains aggregate, it can grind slowly and chew up technique mistakes. Unsanded grout can smear or crumble if the joint is weak. Epoxy grout can resist hand sawing so much that many people switch to specialty blades or power methods.
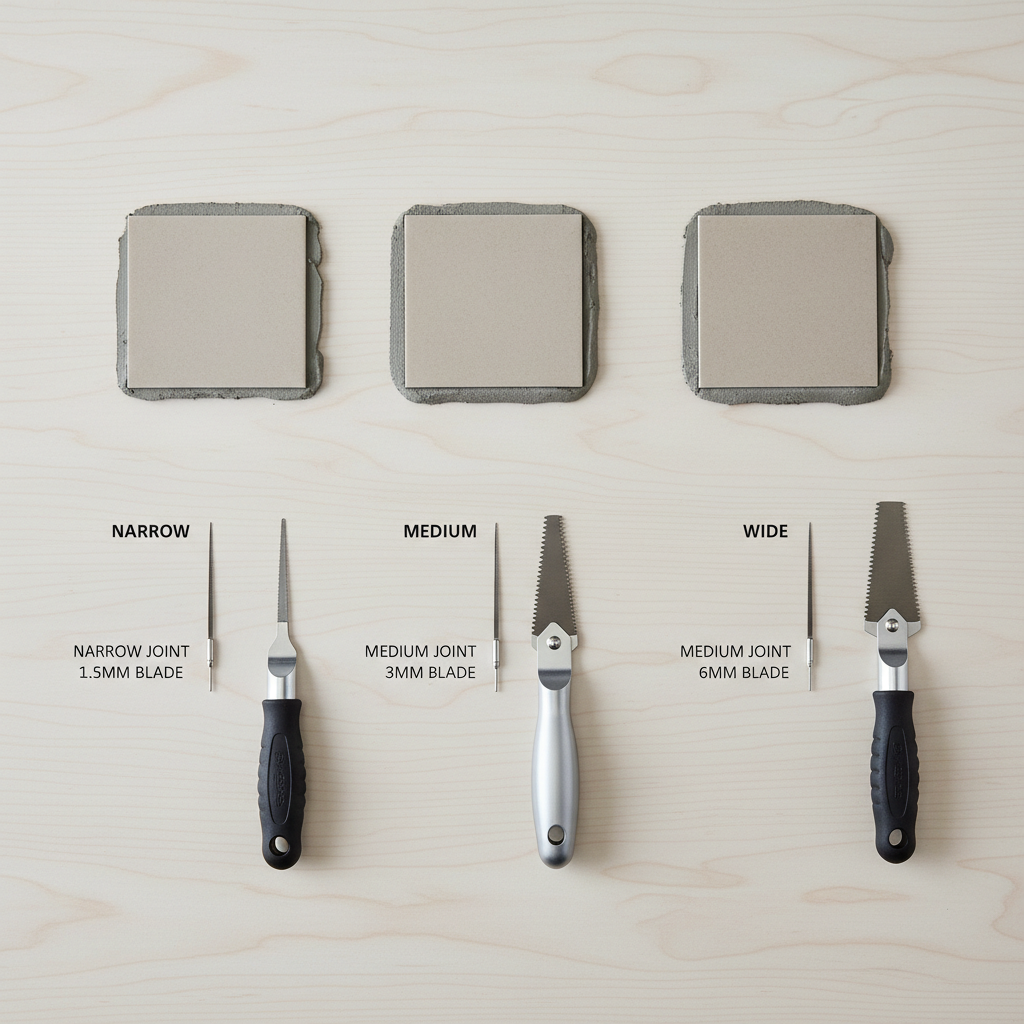
2) The blade width does not match the joint
Too wide and you ride the tile edges, too narrow and you cut a trench without clearing the sides. Many “tile chips” happen because the blade is being forced to fit a joint it does not fit.
3) You are pushing hard instead of letting the grit bite
Carbide grit works by abrasion. If you lean in aggressively, you can bind the blade, hop out of the joint, or chew the tile edge. A lighter touch with more strokes often removes grout faster.
4) You are fighting corners and transitions
Inside corners, changes in plane, and tight spaces behind a toilet tend to invite awkward angles. When the handle angle gets weird, the blade tends to wander. That is not you being “bad,” it is physics.
5) The joint is contaminated or wet
Soap scum, sealers, and constant moisture can gum up the cutting surface. Many people notice the blade “loads up,” then suddenly starts scratching rather than cutting.
Quick comparison table: carbide grout saw vs other options
When people ask which tool to buy, they often mean “what tool gets this specific job done with the least drama.” This table gives a grounded way to choose.
| Tool option | Best use | Pros | Watch-outs |
|---|---|---|---|
| Hand grout saw with carbide blade | Small repairs, delicate tile, tight control | Low cost, precise, less noise | Slow on hard grout, hand fatigue |
| Oscillating multi-tool + grout blade | Medium to large areas, hard sanded grout | Fast removal, consistent depth | Higher risk of tile damage, dust, noise |
| Rotary tool (e.g., Dremel) + grout bit | Narrow joints, detail work | Good for tight lines, controllable speed | Can overcut quickly, dust management needed |
| Manual grout rake / tungsten scraper | Spot removal, corners, touch-ups | Very controlled, simple | Not efficient for long runs |
Self-check: are you using the right approach for your grout?
Before you buy another blade, run this quick checklist. It usually points to the next best move.
- Joint width: Is the joint narrower than your blade thickness? If yes, expect tile contact.
- Grout hardness: Does the grout sound “glassy” when tapped with a screwdriver handle? Hard grout often favors power methods.
- Area size: Is this more than a few square feet? Hand sawing may be correct but exhausting.
- Tile type: Soft glazed ceramic chips easier than many porcelains, so control matters more.
- Location: Shower floor and pan joints often contain sanded grout and grime, which slows everything down.
- Goal: Are you regrouting or just making space for caulk in a change of plane? The depth target differs.
If two or three items raise flags, a grout saw carbide blade still can help, but it may be the “detail tool,” not the main tool.
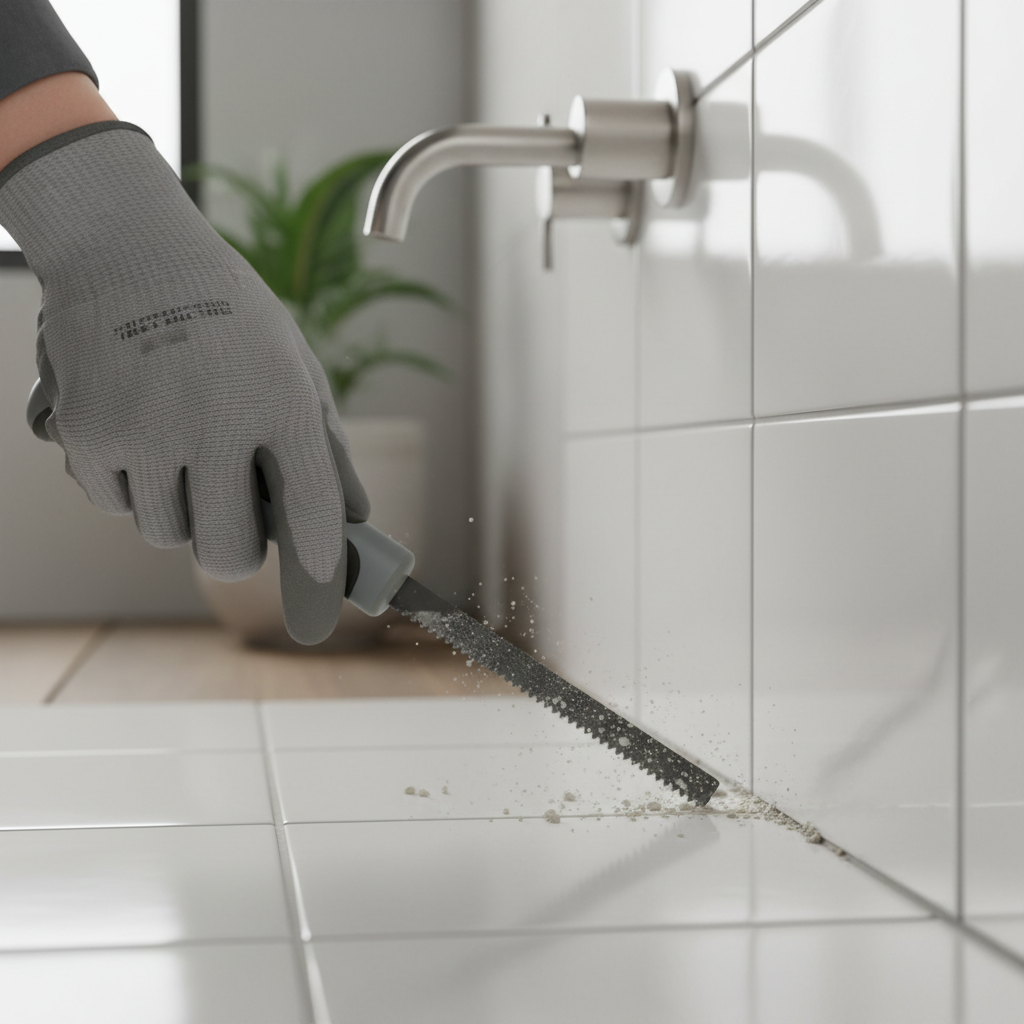
Step-by-step: how to use a carbide grout saw without chipping tile
This is the part most people skip because it sounds basic. But small choices, angle, rhythm, protection, decide whether you spend 20 minutes or an entire Saturday.
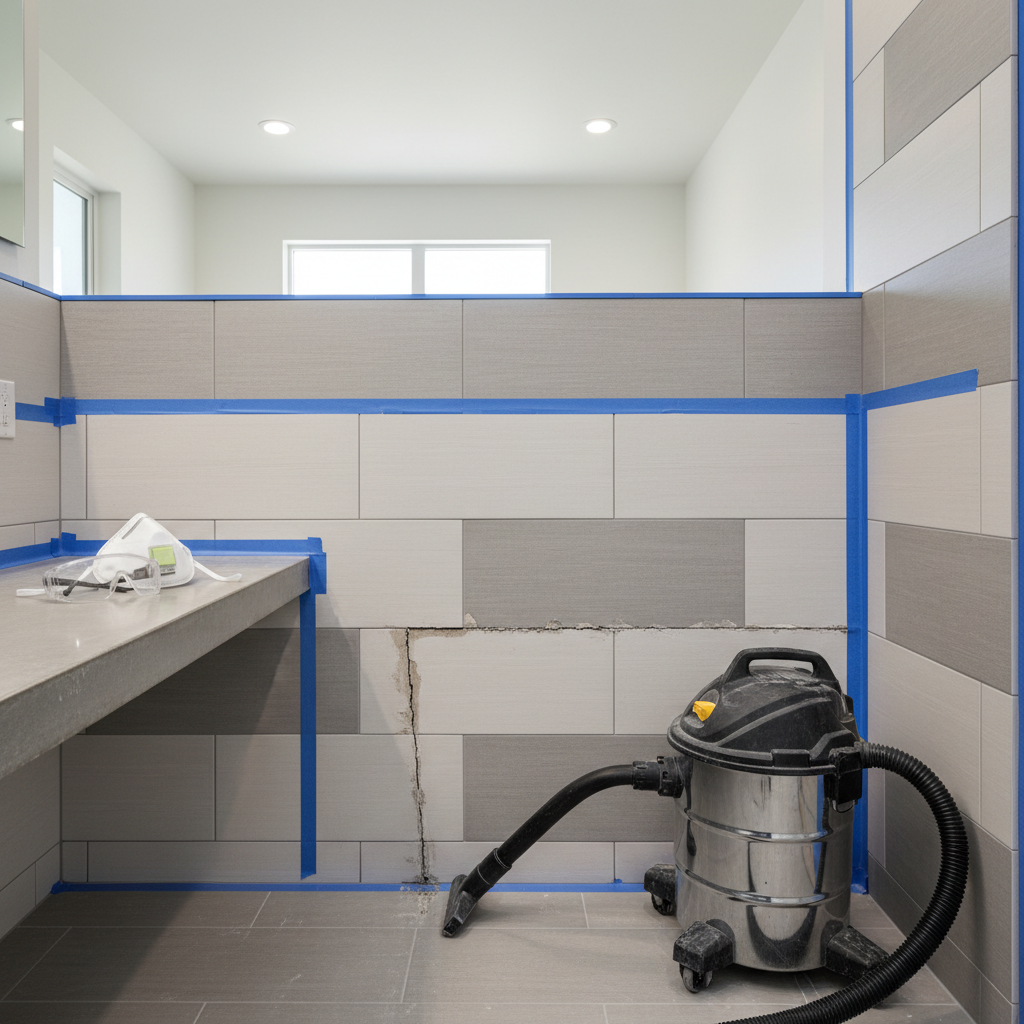
Prep the joint (fast, not fussy)
- Clean the line so the blade hits grout, not soap film. Warm water and a stiff nylon brush often works.
- Mask tile edges if you have delicate glaze or you already see micro-chips. Painter’s tape is cheap insurance.
- Ventilate and control dust. A shop vac hose nearby helps, and a respirator may be appropriate.
According to CDC guidance on silica, reducing airborne dust is a key safety step when disturbing materials that may contain crystalline silica.
Cut a clean starter groove
- Hold the tool so the blade stays centered, then pull with short strokes to “seat” the abrasive edge.
- Start in the middle of a run, not at a fragile corner, you want stability before you chase edges.
- Use moderate pressure. If you feel the blade climbing the tile, back off and reset.
Work to the right depth and width
- For regrouting, many installers aim to remove grout to a depth that supports the new material, not just skim the surface. In practice, deeper removal helps bond, but exact depth can vary by grout type and joint condition.
- Make several passes rather than trying to clear it in one aggressive cut.
- Vacuum or brush out debris often so the blade keeps biting.
Handle corners and changes of plane carefully
- In inside corners, slow down and use shorter strokes.
- If the joint is meant to be caulked, you may only need to clear enough grout to create a clean gap, do not overcut into backing.
- If you are unsure whether a joint should be grout or caulk, check the tile installation guidance for changes of plane, many standards prefer a flexible sealant there.
Mistakes that waste time (and how to avoid them)
- Trying to “sharpen” carbide grit like a knife: grit blades wear, they do not hone. Replace when performance drops.
- Skipping surface cleaning: cutting through residue first makes the whole job feel harder than it is.
- Over-removing in one spot: you end up with low joints and uneven color after regrout.
- Assuming all grout is the same: sanded, unsanded, epoxy behave differently, tool choice changes.
- No eye protection: grout chips can pop up fast, even by hand.
One more small thing: if your blade starts leaving metal marks on tile edges, stop and reassess your blade width and angle, “powering through” usually makes cleanup worse.
Practical buying tips: what to look for in a carbide blade grout saw tool
Not every tool feels the same in hand, and comfort becomes performance when you have ten feet of grout to clear.
- Blade thickness options: a slim blade for narrow joints and a standard blade for typical tile work gives flexibility.
- Replaceable blades: you want easy swaps, because carbide edges wear with abrasion.
- Ergonomic handle: rubberized grip helps when wet or dusty, and reduces hand strain.
- Rigid blade mount: flex causes wandering, which leads to tile edge contact.
- Visibility: a low-profile head makes it easier to see the cut line, especially on floor tile.
If you already own an oscillating tool, a grout saw carbide blade setup can still be worth keeping for tight spots and delicate areas, it is common to use both on one job.
When it is time to call a pro (or switch strategies)
There is a point where the “right” move is not more elbow grease. If you see loose tiles, dark staining that returns quickly, or persistent dampness behind grout, the issue may be substrate or waterproofing, not the joint surface.
- Widespread cracking or hollow-sounding tile: may indicate movement or bond issues.
- Mold concerns or health sensitivity: consider professional assessment, especially if you are unsure what is behind the tile.
- Epoxy grout across a large area: often faster and safer with specialized tools and experience.
If you are renting, or the tile is a premium finish, it can be worth getting a tile contractor’s opinion before you remove too much material.
Key takeaways and next step
A grout saw carbide blade is a solid, controllable way to remove grout, but the “secret” is fit and technique, match blade width to the joint, cut a starter groove, keep pressure moderate, and clear debris frequently. If the grout is extremely hard or the area is big, consider pairing the hand tool with a power option for the long runs, then finishing with the carbide saw for detail.
If you want one action step today, measure your joint width and confirm your grout type, that single check usually tells you whether you need a different blade, a different tool, or just a calmer cutting rhythm.
FAQ
- Can a grout saw carbide blade remove epoxy grout?
Sometimes, but it often feels slow and frustrating. For larger epoxy areas, many people switch to an oscillating tool with the right blade, or ask a pro to avoid tile damage. - How deep should I remove grout before regrouting?
Deep enough for new grout to bond well, not just surface scratching. The practical target varies by joint size and condition, if you are unsure, a tile pro can confirm what makes sense for your install. - Why is my carbide grout saw scratching the tile?
Most often the blade is too wide for the joint or the tool is tilted, so it rides the tile edge. Tape can help, but correct blade size and keeping the blade centered matters more. - Do I need to seal grout after I replace it?
Many cement-based grouts benefit from sealing in wet areas, but products and recommendations vary. Check your grout manufacturer instructions and confirm cure times before sealing. - Is it normal for the blade to clog with gritty paste?
Yes, especially in showers with soap residue. Cleaning the joint first and vacuuming during removal helps the abrasive edge keep cutting. - Should corners be grouted or caulked?
Many standards prefer flexible sealant at changes of plane to handle movement. In real bathrooms you often see grout there anyway, but if that area cracks repeatedly, switching to caulk may reduce repeats. - What safety gear is reasonable for manual grout removal?
Eye protection is a must, and a dust mask or respirator may be appropriate. If dust is noticeable, treat it seriously and improve ventilation and cleanup.
If you are trying to pick a grout saw carbide blade tool for a specific joint width or a tricky shower repair, it can help to share tile type, joint size, and grout type with a supplier or contractor, you usually get a clearer recommendation than guessing off a single product photo.