
The best planer for wood flattening depends less on brand hype and more on your workflow: how rough your stock is, how wide your boards run, and whether you can joint faces reliably before planing.
If you’ve ever fed a board through a planer and still ended up with a twist, a hollow, or that annoying dip at the ends, you already know the pain: a planer can make lumber thinner fast, but it doesn’t automatically make it flat unless the setup and process match the job.
This guide narrows the field for 2026 shoppers in the U.S. market, with a practical comparison table, a quick self-check, and step-by-step advice for getting flatter results, whether you’re in a one-car garage shop or running small production.

What “wood flattening” really means for a planer
A thickness planer references the board against its bed, then cuts the top surface to match. If the bottom face isn’t stable, the planer often “copies” that problem, sometimes making the board look smooth while it still has bow or twist.
In real shops, flattening usually means one of these workflows:
- Jointer + planer: joint one face flat, joint one edge, then plane the opposite face parallel.
- Planer sled method: shim a warped board on a sled so it can’t rock, plane one face flat, then flip and plane normally.
- Router sled / CNC: for slabs or extra-wide stock, then a planer for thicknessing when possible.
If your goal is truly flat boards, the “best planer for wood flattening” is usually the one that stays consistent cut-to-cut, minimizes snipe, and has enough power and cutterhead quality to avoid tearout when you take light passes.
Quick comparison: planers that make flattening easier
Below is a practical way to compare types. Specific models change year to year, but the trade-offs stay surprisingly consistent.
| Planer type | Best for | Typical width | What helps flattening | Trade-offs |
|---|---|---|---|---|
| 13" benchtop (portable) | DIY, small shops | 12–13 in | Easy setup, good results with sled, quick blade changes | Noisy, lighter feed system, snipe control varies |
| 15" stationary (cast-iron) | Serious hobby, small production | 15 in | Mass and rigidity, better feed consistency, stronger dust collection ports | Cost, space, 240V often preferred |
| Helical/spiral cutterhead (any size) | Figured woods, tearout control | Varies | Cleaner cut with light passes, easier “sneak up” flattening | Higher upfront cost, insert maintenance |
| 20"+ industrial | Shops processing lots of stock | 20–24+ in | Power, width, very stable bed, production consistency | Very expensive, heavy, power requirements |
Key takeaway: if you’re flattening cupped or twisted boards often, spend attention on rigidity, feed consistency, and snipe control more than flashy max depth-of-cut numbers.
How to choose the best planer for wood flattening (the specs that matter)
Bed length, rigidity, and infeed/outfeed support
Flattening lives and dies at the moment the board transitions onto and off the bed. Longer, flatter beds and solid extension support reduce the “lever effect” that can cause snipe or subtle taper.
- Look for: stable bed, strong extension tables, easy-to-adjust table alignment.
- Plan for: a roller stand or outfeed support even with a good planer.
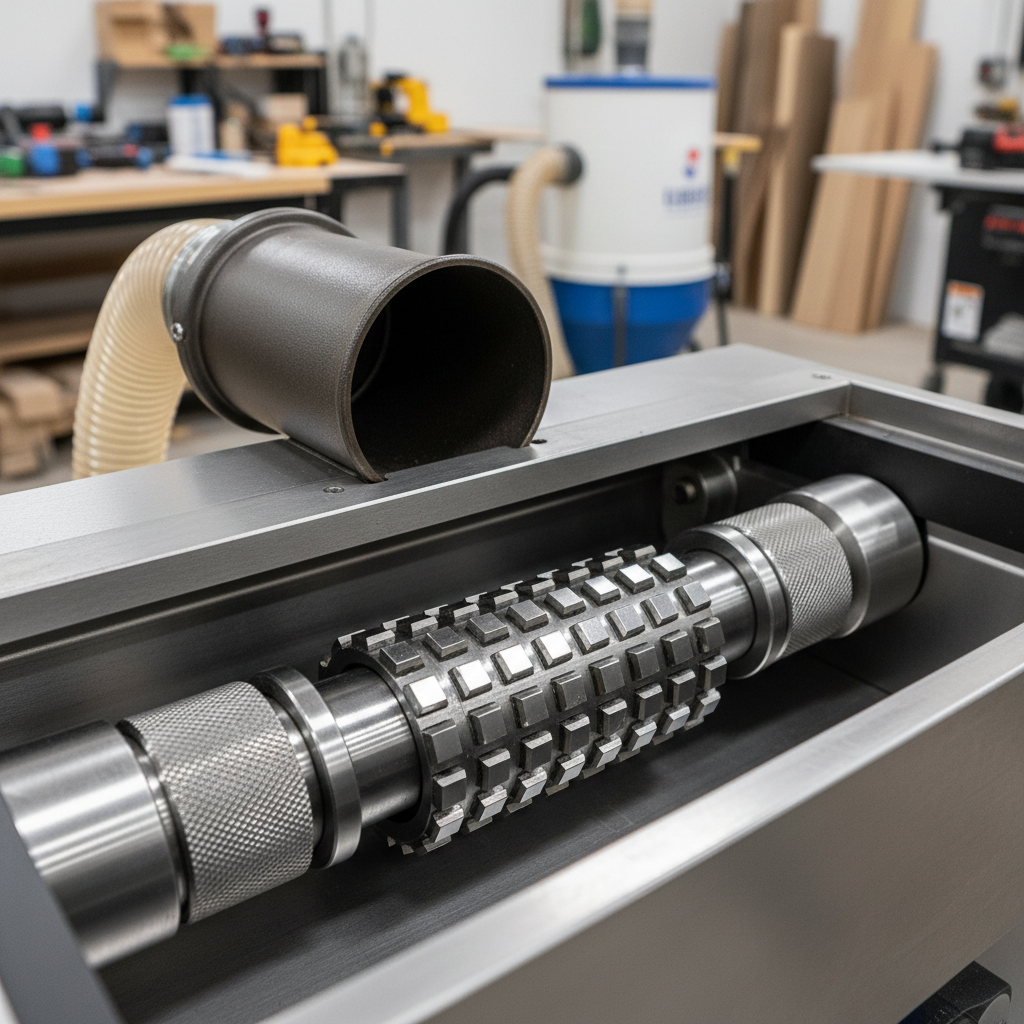
Cutterhead style: straight knives vs helical
Straight knives can do great work, but helical insert heads often make flattening less stressful on tricky grain because you can take lighter passes without paying the tearout penalty as often.
According to OSHA, woodworking machines require proper guarding and safe operating practices; regardless of cutterhead style, treat kickback and contact hazards as real, and follow the tool manual closely.
Feed rate options and depth control you can trust
Two-speed feed is not just a “nice feature.” A slower feed can improve finish and reduce the temptation to hog off material, which is where tearout and chatter tend to show up.
- Helpful features: repeatable thickness scale, sturdy height lock (if included), and smooth elevation mechanism.
- Watch for: sloppy height adjustment that drifts mid-run, it makes “flattening to a reference thickness” frustrating.
Self-check: which planer setup fits your boards and shop?
If you’re shopping for the best planer for wood flattening, this quick checklist usually clarifies what you actually need.
- You mostly buy S3S/S4S lumber and only clean up faces: a quality 13" benchtop can be enough.
- You process rough hardwood regularly, including longer boards: consider a 15" stationary planer or a benchtop plus very solid infeed/outfeed.
- You work with figured maple, white oak, walnut crotch: prioritize helical inserts and take lighter passes.
- You flatten wide glue-ups: width capacity and bed support matter more than max depth-of-cut.
- You see snipe constantly: you might not need a new planer first, you might need better support and calibration.
Practical methods: getting flatter boards with almost any planer
Method A: Jointer + planer (fastest when you have both)
Joint one face until it sits stable on the jointer bed, then plane the opposite face. After that, joint one edge and rip to width. This is the “normal” path for a reason: it’s repeatable.
- Keep planer passes light near final thickness, especially on reversing grain.
- Mark high spots with pencil, it’s a simple habit that prevents chasing thickness blindly.
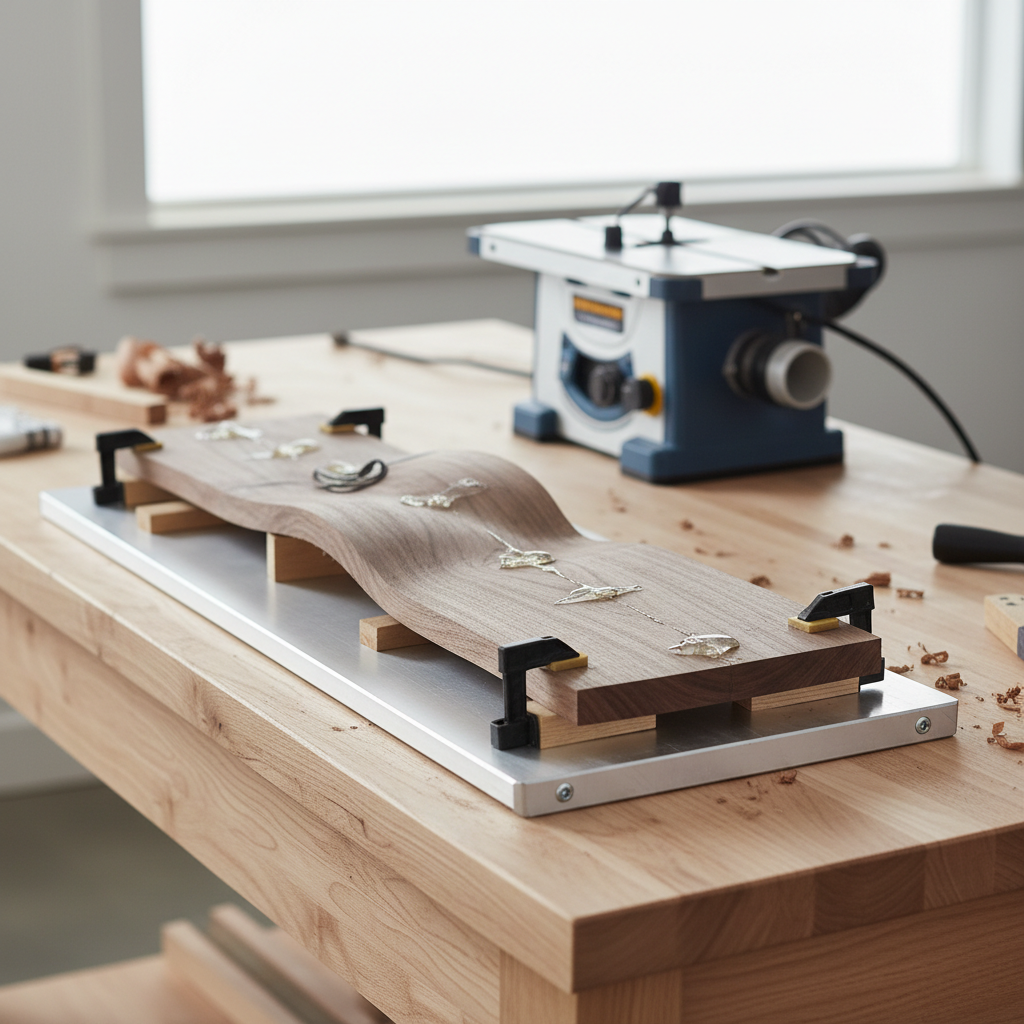
Method B: Planer sled for twisted/cupped boards
This is the go-to workaround when you don’t have a jointer wide enough, or any jointer at all. You immobilize the board so the planer can create a true reference face.
- Sled base: flat plywood/MDF, stiff enough not to sag under pressure.
- Shim: hot glue, wedges, or playing cards under low corners until the board can’t rock.
- Plane: take light passes until the top face cleans up fully, then flip and plane normally.
According to U.S. Consumer Product Safety Commission (CPSC), power tools can present injury risks; if you’re new to sled setups, move slowly, keep hands away from infeed, and consider asking an experienced woodworker to sanity-check your approach.
Method C: Control snipe with support and technique
Snipe is that deeper cut at the first or last few inches. Many planers can be tuned to reduce it, but technique still matters.
- Use infeed/outfeed support so the board stays level as rollers grab and release.
- Keep boards longer than final length, then trim ends after milling.
- Run boards back-to-back to reduce the “unsupported” moment between pieces.
Common mistakes that sabotage flattening (even with a great planer)
People blame the machine, but a lot of “planer can’t flatten” complaints come from these issues.
- Taking heavy passes to save time: it increases tearout and can exaggerate roller marks, which then get sanded away unevenly.
- Skipping moisture reality: wood movement can undo your work overnight, especially if you plane to final thickness immediately.
- Dull knives/inserts: dull cutting edges push fibers instead of cutting cleanly, making chatter and tearout more likely.
- Misaligned tables: small extension-table droop can translate into repeatable snipe.
- Dust collection ignored: chips recirculating can mar the surface and affect feed consistency.
Buying recommendations by user type (2026 reality check)
Rather than naming a single winner, it’s more honest to map the “best planer for wood flattening” to how you actually work.
- Apartment/limited space: a 12–13" benchtop planer + folding stand + sled method. Budget for hearing protection and dust management.
- Weekend furniture builder: prioritize a planer with solid snipe control and easy blade changes; if budget allows, helical inserts pay off in nicer surfaces on mixed grain.
- Garage shop doing lots of hardwood: a 15" stationary planer often feels like the “endgame” before industrial machines, mostly due to mass and consistency.
- Small production: consider helical head + strong dust collection + consistent feed; downtime and rework cost more than the machine.
Key point: if you routinely need wide flattening beyond 13–15", it may be smarter to plan for a router sled or outsource occasional slab flattening, instead of buying too much planer for the rest of your work.
Conclusion: pick for process, then tune for results
The best results come when your planer matches your workflow, not when it simply has the biggest specs on the box. If you joint first, support long boards, take lighter passes, and keep blades sharp, even a portable machine can produce impressively flat stock.
If you want a simple next step, do two things: measure how wide your typical boards really are, then decide whether you’ll use a jointer or a planer sled as your primary flattening method, that decision usually narrows the right planer category immediately.