
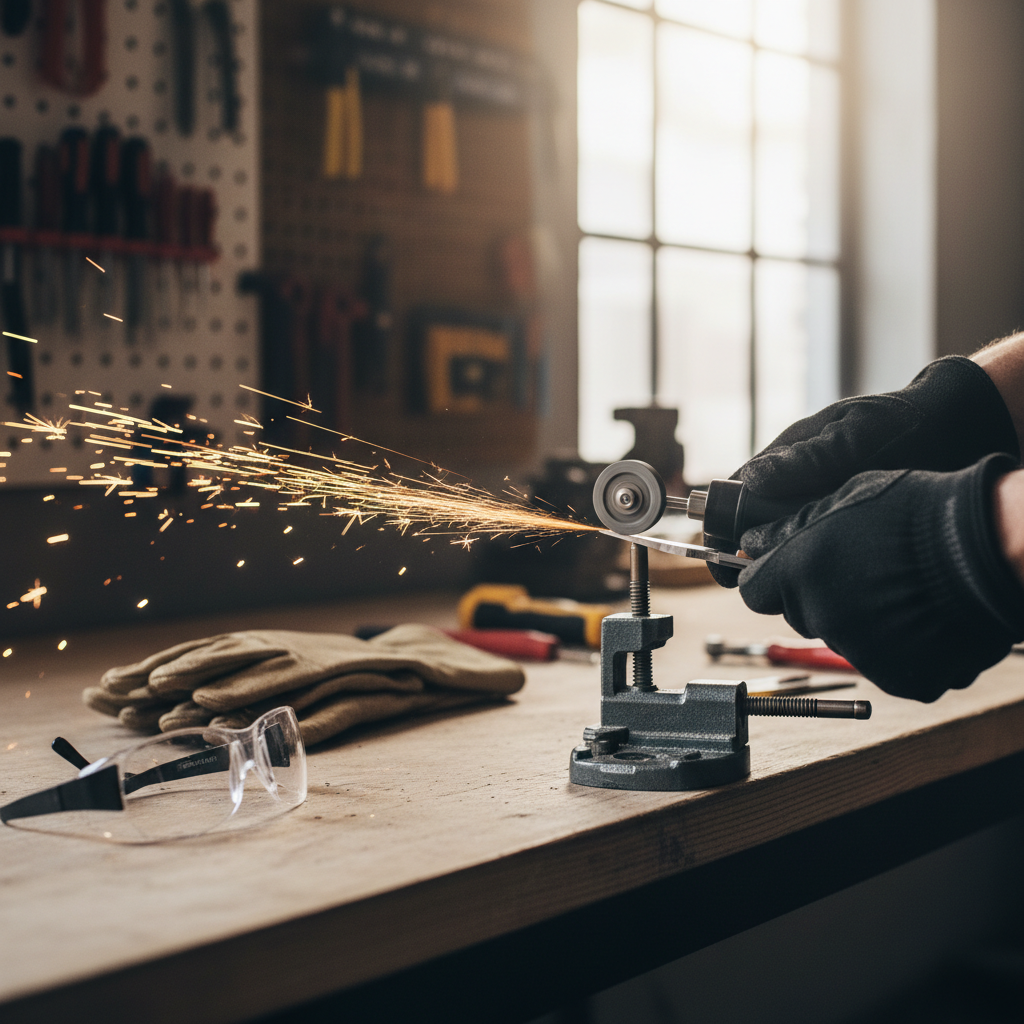
Grinding stone rotary tool setups can sharpen surprisingly well, but only when the stone type, grit, RPM, and angle match what you’re trying to edge back into shape. If your results look burnt, wavy, or dull again after a few cuts, it’s usually not “bad technique” so much as a mismatch in wheels and settings.
This topic matters because rotary tools remove material fast, and that’s both the benefit and the trap. On small blades, garden tools, and shop cutters, it’s easy to overheat the edge, round the bevel, or grind a notch before you even notice.
Below is a practical way to pick the right grinding stone, set your tool up, and sharpen common items without guessing. I’ll also flag the moments where a bench grinder, a file, or a pro sharpening service tends to be the smarter call.
Why rotary-tool sharpening fails (and how to spot the real cause)
Most “this stone won’t sharpen” complaints come down to a few repeat issues. Fixing them usually improves results more than switching brands.
- Wrong abrasive for the steel: Many general gray stones struggle on very hard alloys, while silicon carbide or diamond options cut more reliably.
- Grit too coarse or too fine: Coarse grit reshapes fast but leaves a toothy edge, ultra-fine polishes but won’t re-profile a damaged bevel.
- RPM too high: High speed can overheat thin edges quickly, softening the edge in some steels and glazing the stone.
- Pressure too heavy: Hard pushing makes the stone skate, chatter, or dig, and it’s a common way to round the edge.
- Stone loaded or glazed: When metal smears into the pores, the wheel stops cutting and starts rubbing.
According to OSHA, abrasive wheels can cause serious injury if they break or are used improperly, so it’s worth treating “small rotary stones” with the same respect you’d give larger grinding wheels.
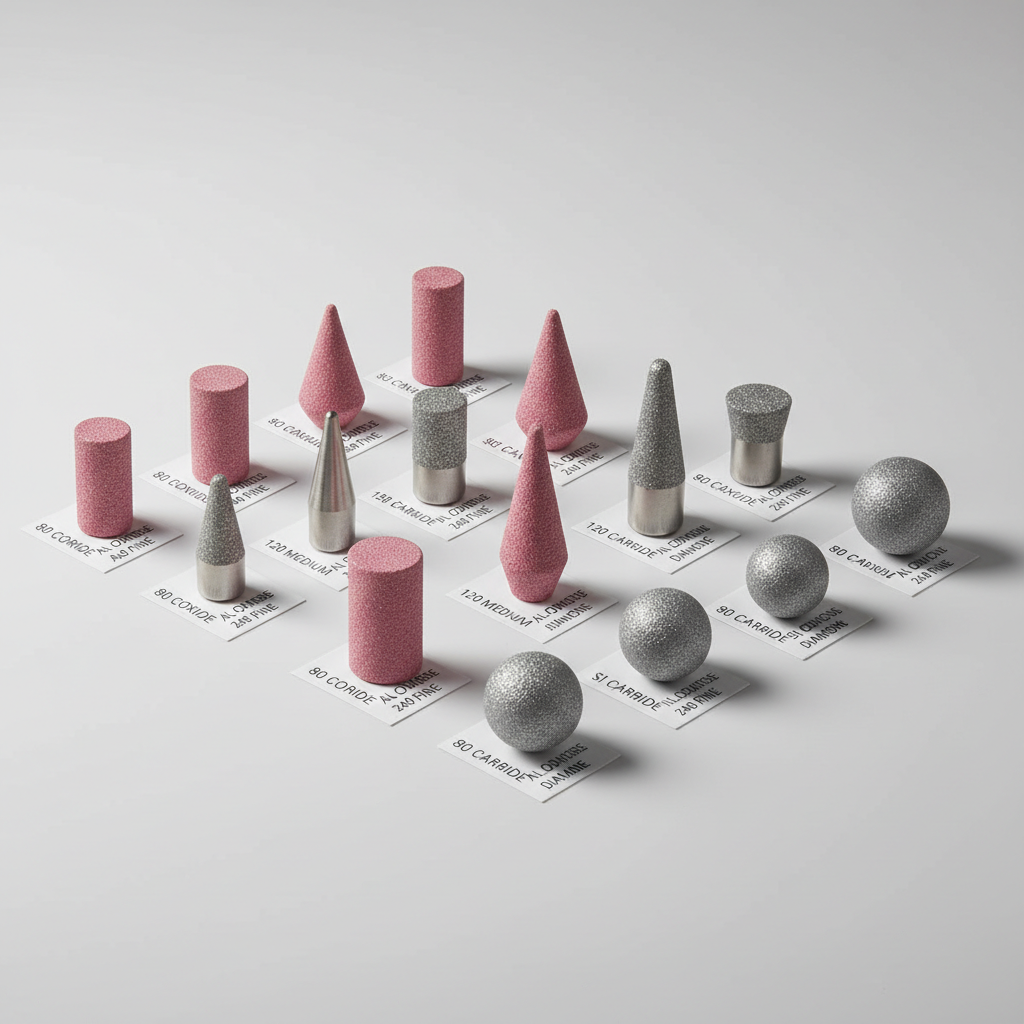
Choosing the right grinding stone: grit, material, and shape
If you want predictable sharpening, start by matching the stone to the job, not the other way around. A grinding stone rotary tool can carry multiple stones, and swapping takes seconds, so you don’t need one “do-it-all” point.
Grit range (what it actually does)
- Coarse (60–120 grit): Fast shaping, chips and nicks, bevel correction. Leaves deeper scratch pattern.
- Medium (150–240 grit): General touch-ups, restores an edge without removing too much.
- Fine (320+ grit): Light refinement before honing on a stone/strop. Not ideal for repairing damage.
Abrasive type (quick, honest guidance)
- Aluminum oxide (often gray/pink): Common, versatile for many steels, especially for general grinding.
- Silicon carbide (often green/black): Cuts hard materials more aggressively, can be useful on some harder steels and non-ferrous metals.
- Diamond (coated): Often the easiest path for very hard edges, carbide, or when other stones feel like they just polish.
If you’re sharpening everyday carbon steel tools, standard stones usually work. If you’re working with very hard knife steel or carbide, you’ll often get better “bite” from diamond, even at lower pressure.
Shape matters more than people think
- Cylinders: Flat bevels, chisels, mower blade touch-ups (carefully).
- Cones/points: Inside curves, hooks, tight areas, small notches.
- Rounded/ball: Carving and blending, less ideal for crisp bevel control.
Quick self-check: are you set up to sharpen, or just grind?
Before you touch the edge, run through this. It saves time and reduces the chance you “fix” sharpness by removing too much metal.
- Is the edge damaged? Chips, rolled spots, or a flat shiny line at the edge usually need coarse grit first.
- Can you hold a steady angle? If not, plan to use a simple guide, a marker trick, or a clamp.
- Do you have cooling ready? A cup of water for dips works for many tools, but avoid quenching some blades if the maker warns against it.
- Is the stone clean? If it looks shiny and won’t produce dust, it may be glazed and needs dressing or replacement.
- Is the tool stable? If the workpiece moves, the bevel will wander.
One more reality check: a rotary tool is great for touch-ups and small edges. For large blades that need a full regrind, it can be slow and inconsistent unless you build a jig.
Sharpening step-by-step with a rotary grinding stone (practical method)
The goal is controlled removal, not speed. You’re chasing a consistent bevel and a clean apex, then finishing with lighter refinement.
1) Lock down the work and mark the bevel
Clamp the tool or blade if possible. Color the bevel with a marker, then make a light pass. If you remove marker at the shoulder but not at the edge, your angle is too steep; if you hit only the edge, your angle is too shallow.
2) Set a conservative speed
Lower-to-mid RPM tends to be more forgiving for sharpening. Exact RPM depends on your tool and stone diameter, but if you see discoloration, smell hot metal, or the stone “skates,” back off speed and pressure.
3) Use light pressure and short passes
Let the abrasive do the work. Short strokes help you keep the bevel from rounding. If the stone bounces, you’re pushing too hard or the edge isn’t supported.
4) Watch for a burr, then switch to finer grit
On many edges, you’ll feel a slight burr on the opposite side when you reach the apex. Once it’s consistent, shift to medium/fine to reduce scratch depth, then finish with a hand stone, ceramic rod, or strop if you want a cleaner cut.
5) Deburr gently
Don’t chase the burr with heavy grinding. A couple of light alternating passes, then a quick hone, usually works better than trying to “grind it off.”
Recommended approaches by tool type (with a comparison table)
This is where most people save time: different tools want different outcomes. A hatchet doesn’t need the same edge as a chisel.
| Tool | What “sharp enough” looks like | Stone/grit starting point | Notes |
|---|---|---|---|
| Pruning shears | Clean slice, minimal crushing | Medium (150–240) | Match existing bevel; avoid grinding the flat side much |
| Lawn mower blade | Even edge, not razor | Coarse to medium (80–180) | Keep it balanced; consider a balancer after grinding |
| Chisels/plane irons | Consistent bevel + flat back | Fine (240–400) after shaping | Rotary tool is risky here; hand stones often give better control |
| Axes/hatchets | Durable bite, no chips | Coarse (60–120) | A slightly convex edge often holds up better than a thin flat bevel |
| Drill bits (basic touch-up) | Symmetrical lips | Fine/medium with a point stone | Geometry is tricky; a drill-bit sharpener can be easier |

Mistakes to avoid (they waste metal and time)
- Grinding until the edge turns blue: That color can indicate overheating, and the edge may lose hardness depending on steel and heat treat.
- Trying to “polish sharp” with a coarse stone: Deep scratches can leave a weak, toothy apex that folds quickly.
- Using the stone side-on when it’s not designed for it: Some mounted stones aren’t meant for side loading; they can crack.
- Skipping the finish: Many edges feel sharp after grinding but cut poorly until you deburr and refine.
- Freehanding tiny angles without a reference: The marker trick or a simple wedge guide keeps you honest.
According to ANSI (through standards commonly referenced for abrasive safety), correct wheel use and guarding practices matter; if your rotary setup lacks proper guarding, keep your face out of the plane of the wheel and use eye protection.
When to switch tools or get help
A grinding stone rotary tool is not always the right answer. If you notice any of these, you’ll usually get better results with a different approach.
- Expensive knives or unknown heat treat: A pro sharpener or guided system reduces the risk of overheating and uneven bevels.
- Large reprofiling jobs: Bench grinders, belt grinders, or files remove material more predictably for big edges.
- Carbide or specialty cutters: Diamond abrasives or dedicated services tend to be safer.
- Cracks, deep chips, or severe corrosion: Regrinding may weaken the tool; consider replacement or professional evaluation.
If you’re unsure about steel type, temper, or safe quenching, it’s reasonable to consult the tool manufacturer or a sharpening professional, especially for blades used in demanding work.
Key takeaways and a simple action plan
If you only remember a few things, make them these: keep speed and pressure conservative, use a stone that actually cuts your material, and stop grinding once you reach a consistent burr. From there, a light finish often does more for performance than extra grinding.
- Pick the stone: coarse for repair, medium for touch-up, fine for refinement.
- Control heat: short passes, light pressure, pause often.
- Confirm angle: marker test, clamp when possible.
- Finish: deburr, then hone.
If you want a cleaner edge with less trial and error, set up two stones (coarse + medium) and plan to finish by hand. That workflow stays fast without pushing the rotary tool beyond what it’s good at.
FAQ
What grit grinding stone should I use to sharpen with a rotary tool?
For a normal touch-up, medium grit around 150–240 is a good starting point. If the edge has chips or a flat spot, begin coarser, then move finer so you’re not left with deep scratches at the cutting edge.
Can a grinding stone rotary tool sharpen kitchen knives?
It can, but it’s easy to overheat or unevenly grind thin kitchen edges. Many people get more consistent results with water stones or guided systems, and a pro sharpener can be the safest option for pricier knives.
Why does my grinding stone stop cutting and just gets shiny?
That’s often glazing or loading, meaning metal clogs the abrasive surface. Light dressing, cleaning, or switching to a different abrasive type can restore cutting, but sometimes replacement is the practical fix.
What speed should I run when sharpening with a rotary tool?
Lower-to-mid speed is usually easier to control and helps reduce heat. If you see discoloration or feel the edge getting hot fast, drop RPM, reduce pressure, and take shorter passes.
Do I need to use water for cooling while sharpening?
Cooling can help prevent overheating, especially on thin edges. Some tools and steels handle quick dips fine, but recommendations vary by manufacturer, so if the blade has specific heat-treat guidance, follow that.
Is a diamond bit better than a grinding stone for sharpening?
Diamond can cut very hard materials more confidently and with less pressure, which often improves control. For everyday steels, traditional stones still work well when grit and technique match the task.
How do I know I’ve sharpened enough?
Look for a consistent bevel scratch pattern and a small burr along the full edge, then remove the burr with lighter passes and a quick hone. If only sections cut well, your angle or contact pressure is probably inconsistent.
If you’re sharpening often and want a more repeatable routine, consider building a small angle guide, stocking two grits you trust, and pairing your rotary setup with a simple hand-hone for finishing, it’s usually the least frustrating “upgrade” without buying a full sharpening system.