
cold chisel set metal steel is one of those tool purchases you only appreciate after you’ve rounded a cheap chisel, mushroomed the head, or watched the tip skate across hardened metal.
If you’re breaking bolts, cutting rivets, splitting sheet, or knocking welds apart, the set matters as much as your hammer. A good set hits harder, stays sharper longer, and behaves predictably when the job gets ugly.
This guide focuses on what to look for in a steel/metal cold chisel set for breaking, how to match chisel profiles to real tasks, and how to use them without turning the shop floor into a flying-chip zone.
What a cold chisel set is really for (and what it isn’t)
A cold chisel is designed to cut and fracture metal without heating the workpiece, which is why it’s common in automotive, fabrication, maintenance, and demolition-adjacent jobs. “Cold” just means you’re not using a forge or torch to soften the material first.
Where people get frustrated is using the wrong profile, the wrong hardness, or the wrong striking tool, then blaming the chisel. The reality is a cold chisel set metal steel works best when you treat it like a cutting tool, not a pry bar.
- Great for: cutting rivets, splitting seized nuts, shearing spot welds, trimming bolts, breaking cast iron edges, removing pins, cleaning up slag.
- Not ideal for: prying, bending, or driving like a punch (use a punch set for pins).
According to OSHA..., hand tools with mushroomed heads and damaged striking surfaces can increase the risk of chipping and eye injuries, so condition and proper use are not “nice-to-have” details.
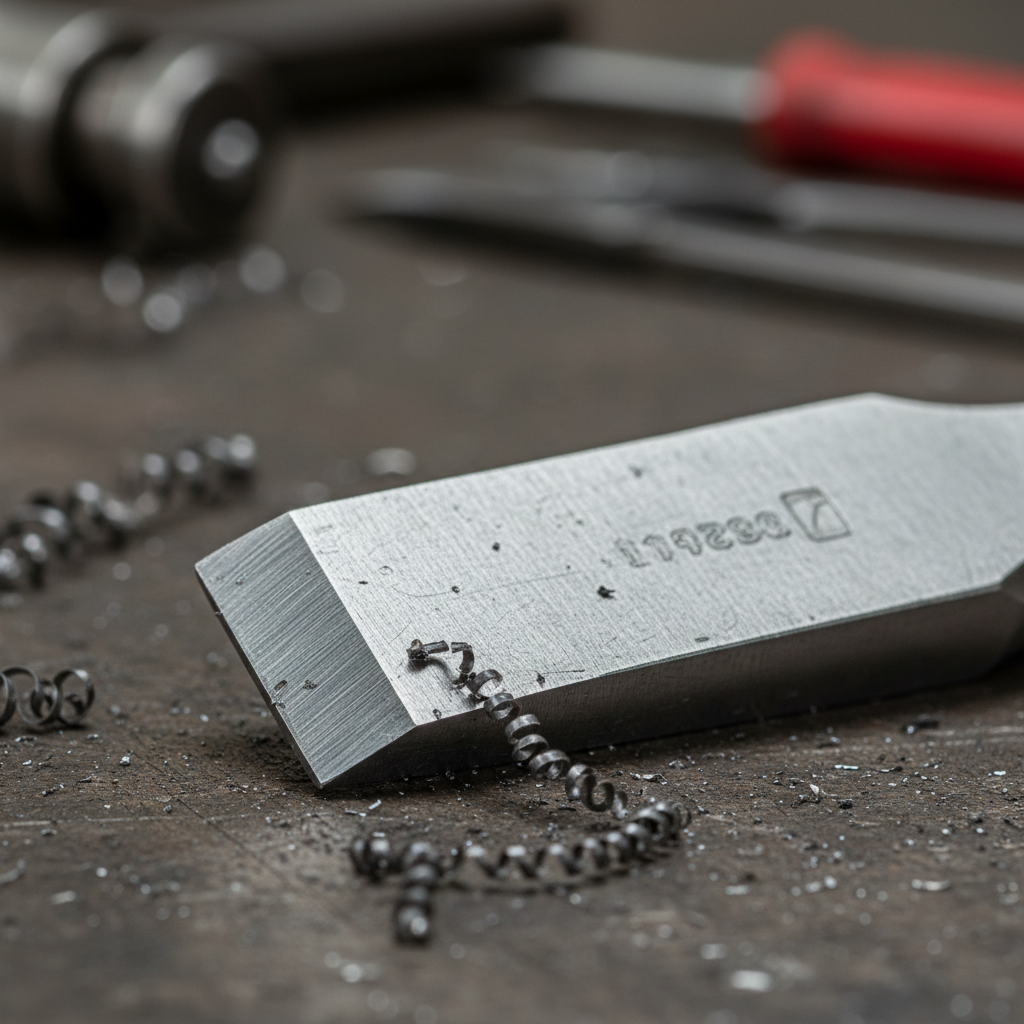
Why steel quality and heat treatment change everything
Most sets look similar online: shiny steel, “chrome vanadium,” “hardened,” “heat-treated.” The difference shows up after a few hours of real breaking work, when the edge either stays crisp or turns into a shiny, rolled-over wedge.
In many cases, you want a chisel with a hard cutting edge and a tougher striking end. That balance usually comes from heat treatment and tempering, not from the marketing words stamped on the shank.
- Too soft: edge deforms quickly, you keep regrinding, cuts wander.
- Too hard/brittle: edge can chip when it meets hardened fasteners or uneven welds.
- Right balance: edge holds, head resists mushrooming, tool feels “calm” under impact.
If you’re regularly hitting tough steel (old suspension bolts, farm equipment, structural brackets), a cold chisel set metal steel that’s clearly intended for metalworking, not masonry, tends to be a safer bet.
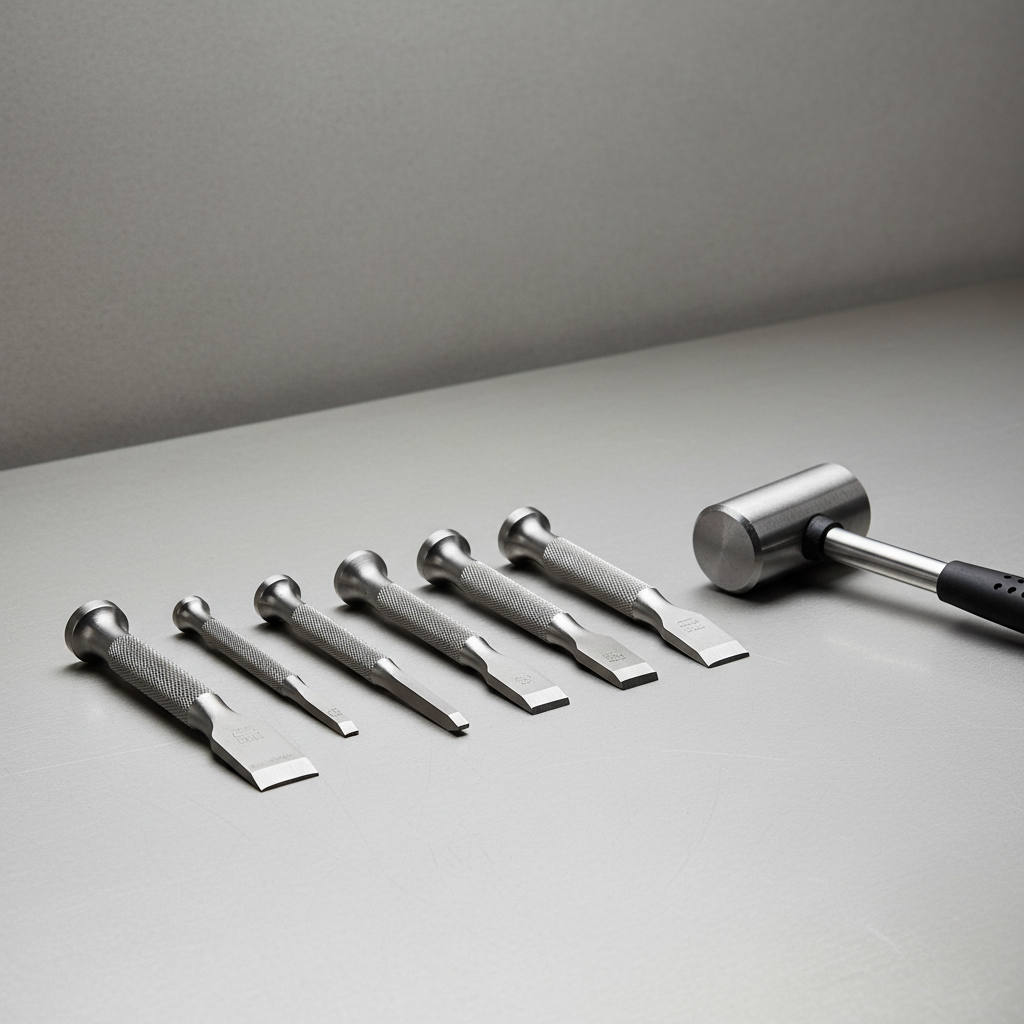
Picking the right chisel profiles for breaking work
Sets usually include a mix of tip shapes. The “best” set is the one that matches the break jobs you actually see, not the one with the most pieces.
Common profiles and when to use them
- Flat (straight) chisel: general cutting, splitting nuts, trimming plate edges, peeling weld bead.
- Cape chisel (narrow): cutting keyways, starting a split in a tight spot, controlled grooves.
- Round nose: channels, curved grooves, removing material without sharp corners catching.
- Diamond point: starting holes, splitting rivet heads, opening cracks in stubborn parts.
For “breaking” as in rough separation, a flat plus a diamond point covers a lot. If you do machinery repair or precision tear-down, the cape earns its spot.
Quick self-check: what kind of user are you?
Before you buy or upgrade, use this to avoid overbuying and underbuying at the same time.
- Occasional DIY: you cut a bolt or free a stuck bracket once in a while, you need durability and a couple of core profiles.
- Auto/garage regular: you see rusted fasteners, exhaust hardware, suspension parts, you need edge retention and a set that survives repeated impacts.
- Fabrication/maintenance: you deal with welds, plate, and mixed alloys, you want more profiles and predictable heat treat.
- Heavy breaking/demolition-like: you hit hard, often with heavier hammers, you need thicker shanks and a set built for abuse.
If you’re in the middle two categories, a cold chisel set metal steel with 3–5 pieces often beats a 12-piece kit with duplicates you never reach for.
What to look for when buying: a practical checklist
Specs can get vague fast, so it helps to focus on details you can verify.
- Material callout: high-carbon steel or alloy tool steel, with clear heat-treatment language.
- One-piece forged construction: usually preferable for impact tools.
- Ground cutting edge: cleaner factory grind means less setup.
- Proper shank thickness: thicker isn’t always better, but too thin flexes and chips edges.
- Striking end design: chamfered edges can reduce spalling, and it’s easier to maintain.
- Storage: a roll pouch or case sounds boring, but it protects edges and prevents rust.
If the listing or packaging warns against striking with hardened hammers, take it seriously. Many cold chisels are intended for use with a softer-faced hammer or a standard steel hammer in good condition, depending on the chisel design.
Chisel set comparison table (what matters in real use)
This table is a quick way to translate marketing claims into work outcomes.
| Feature | What it affects | What to prefer for breaking |
|---|---|---|
| Heat treatment & temper | Edge life, chipping risk, head mushrooming | Balanced hardness: hard edge, tougher striking end |
| Profile mix | Control and access in tight spots | Flat + diamond point minimum, add cape for grooves |
| Shank thickness/length | Impact transfer and stability | Thicker for heavy hits, longer for reach and knuckle safety |
| Factory grind quality | How cleanly the tool starts cutting | Even bevel, no burn marks, consistent edge line |
| Corrosion protection | Rust and edge pitting over time | Coating helps, but storage and oiling matter more |
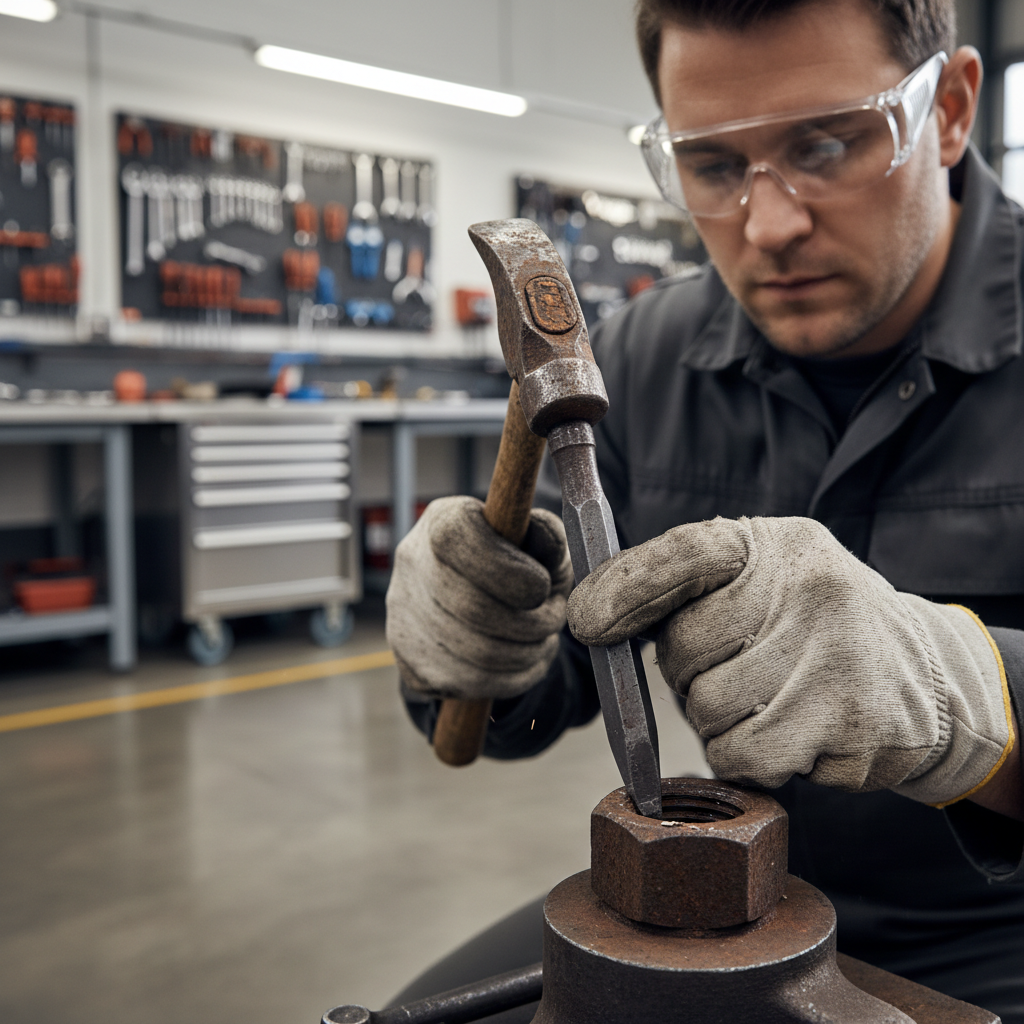
How to use a cold chisel set safely and effectively (step-by-step)
cold chisel set metal steel tools work fast when your setup is stable and your strikes are controlled. When something feels sketchy, it usually is.
1) Prep the work so the tool can bite
- Clamp the part whenever possible, movement kills accuracy and increases slip risk.
- Mark a cut line, even a rough line helps keep the chisel from walking.
- If you’re cutting a nut or rivet, start with a shallow “seat” strike to create a track.
2) Match hammer weight to the chisel
- Light trimming: 12–16 oz hammer can work.
- Breaking and splitting: a 2–3 lb hammer often delivers better control than frantic light taps.
- Heavy work: a small sledge can make sense, but only if the part is secured and your stance stays stable.
According to NIOSH..., eye protection matters when tasks can generate flying fragments, so safety glasses (and sometimes a face shield) is a sensible baseline for chisel work.
3) Use the right angle
- For cutting: typically a lower angle so the edge shears instead of bounces.
- For splitting: aim so the tip drives into the line, then follow the crack rather than forcing a new one.
4) Stop when the head mushrooms
If the striking end starts to flare, dress it on a grinder. Waiting too long increases chip risk. Keep water nearby and avoid overheating the steel while grinding, overheating can soften the tool.
Maintenance that actually extends tool life
A set that “wears out fast” is often just dull or incorrectly reground. A few habits make a noticeable difference.
- Regrind, don’t just keep hitting: a sharp edge cuts with fewer blows and less bouncing.
- Keep bevels consistent: uneven bevels pull the chisel off-line.
- Light oil after use: especially if you store tools in a humid garage or truck box.
- Inspect tips: if you see chips or cracks, retire that chisel from heavy strikes.
If you share tools on a crew, labeling or color-coding handles can reduce “mystery damage” from someone using your chisel as a punch.
Common mistakes (and the quick fixes)
- Using a chisel as a pry bar: switch to a pry tool, chisels are for impact cutting.
- Striking with a damaged hammer face: dress or replace the hammer, bad faces throw chips.
- Skipping clamping: add a vise, C-clamps, or a solid support block, it speeds up the job.
- Trying to cut hardened fasteners: many high-grade bolts fight back; consider cutting wheels or a professional approach if breakage risk climbs.
When the material behaves unpredictably, it’s usually safer to slow down and reassess rather than “hit it harder.”
When it’s worth getting professional help
If you’re working near fuel lines, pressurized systems, energized equipment, or structural members, the risk calculation changes. In those cases, consulting a qualified mechanic, fabricator, or site professional is often the smarter call, even if the cut itself seems simple.
The same goes for jobs where a slipped strike could damage a critical sealing surface or bearing seat, the repair cost can dwarf the price of the right tool or labor.
Conclusion: choosing a set that breaks metal without breaking your workflow
A solid cold chisel set metal steel comes down to balanced heat treatment, a few useful profiles, and a tool you can maintain without drama. If you buy for the work you do most often, keep edges sharp, and stop using damaged striking ends, you’ll get cleaner breaks with fewer swings.
If you want one immediate action, inspect your current chisels and hammer faces today, then replace or dress anything mushroomed or chipped before the next “quick” break job turns into a safety problem.
Key takeaways
- Profiles matter: flat and diamond point cover most breaking tasks.
- Heat treatment matters more than piece count: edge holding and toughness drive real value.
- Safe setup is faster: clamping and eye protection reduce mistakes and rework.
FAQ
What’s the difference between a cold chisel and a masonry chisel?
A cold chisel is shaped and treated for cutting metal, while masonry chisels target concrete and stone. They can look similar, but using the wrong one often means faster edge damage and less control.
Can I use a cold chisel set on hardened steel bolts?
Sometimes, but it’s inconsistent. Many hardened fasteners resist cutting and can chip the chisel edge. If you’re unsure, a cut-off wheel or another method may be safer, and a pro opinion helps for critical parts.
How do I know if my chisel is too dull to use?
If the tip starts sliding, raising a shiny burr instead of biting, or you need noticeably more force for the same cut, it’s time to regrind. Dull chisels also increase slip risk.
What hammer should I pair with a steel cold chisel set for breaking?
For many garage tasks, a 2–3 lb hammer offers good control and impact. Very light hammers can lead to repeated taps and poor tracking, while oversized sledges can get unsafe if the work isn’t firmly secured.
Is a mushroomed chisel head dangerous, or just ugly?
It can be dangerous. The flared edges may chip under impact. Dress the head on a grinder and inspect it often, especially if multiple people use the set.
How often should I sharpen or regrind cold chisels?
There’s no fixed schedule. Regrind when you see rolling, chipping, or loss of bite. People who do frequent breaking work might touch up edges regularly, while occasional users do it far less.
Do coatings (black oxide, chrome) matter for performance?
They help with corrosion resistance and cleanup, but they don’t replace good steel and heat treatment. Storage, light oiling, and keeping edges protected usually matter more long-term.
If you’re trying to choose a set for regular breaking work and want a simpler path, make a short list of the materials you cut most, the hammer weight you typically use, and the profiles you reach for, then pick a cold chisel set that matches that reality rather than the biggest kit on the shelf.