
mallet rubber non marking is the kind of tool you reach for when you need a controlled hit but can’t risk dents, scuffs, or that annoying black transfer on finished surfaces. If you’ve ever tapped a cabinet face frame into place and regretted it immediately, you already understand the problem.
Soft hits matter more than people think, especially in trim work, furniture assembly, automotive interiors, and light machine setup. A “normal” hammer can be too aggressive, while a cheap rubber mallet can still leave residue, deform, or bounce in a way that makes alignment harder.
This guide breaks down what “non-marking” really means, how to pick the right hardness and head style, what to avoid, and a few practical habits that keep your work clean while still getting parts seated properly.

Why “Non-Marking” Rubber Mallets Still Leave Marks Sometimes
The label sounds simple, but real-world results depend on material, surface finish, and how you strike. Many “non-marking” heads are white, gray, or translucent rubber or plastic-like compounds designed to reduce pigment transfer, but that doesn’t guarantee a spotless surface every time.
- Material transfer: Softer compounds can smear or leave a film on matte paint, unfinished wood, or textured plastics.
- Embedded grit: The most common culprit is dust, sand, metal filings, or shop grit stuck on the mallet face, then pressed into your work.
- Surface sensitivity: High-gloss lacquer, anodized aluminum, and soft woods show contact marks more easily, even from clean tools.
- Heat and friction: Repeated tapping in one spot can warm the face and increase rub marks, especially on coatings.
According to OSHA, hand tools should be kept in good condition and used appropriately to help reduce workplace hazards. That “good condition” part applies here too, a dirty or damaged face defeats the whole point.
Quick Self-Check: Do You Actually Need a Non-Marking Mallet?
If you’re on the fence, don’t overbuy. A mallet rubber non marking tool is most valuable when you’re striking parts that must look finished when you’re done, or parts that crack if you hit too hard.
- You work on finished wood, laminate, veneer, or pre-painted trim.
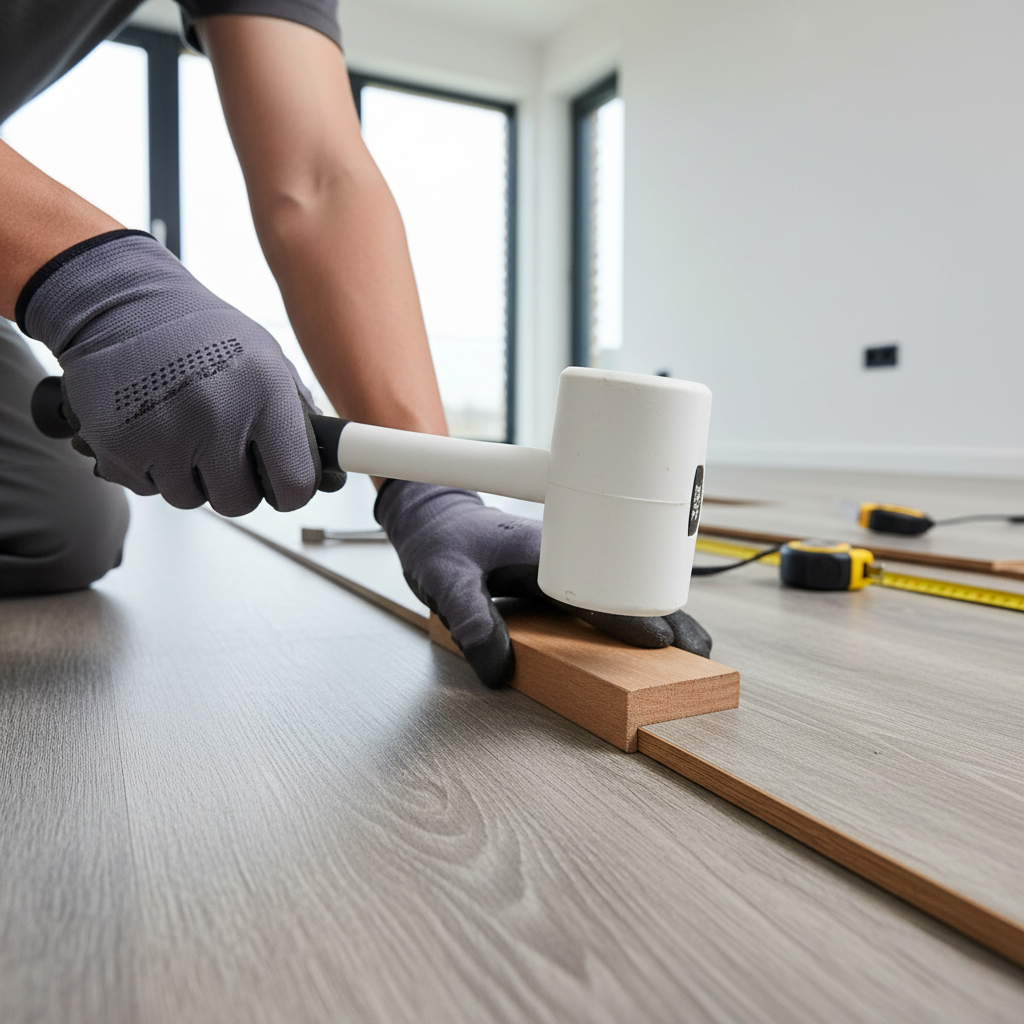
- You install flooring (LVP, laminate) using tapping blocks where scuffs are obvious.
- You do assembly and alignment on parts that should seat with persuasion, not force.
- You handle automotive interior panels, clips, and plastic trim that scratches easily.
- You’ve seen black marks from standard rubber mallets and you’re tired of cleaning them.
If most of your hits land on sacrificial blocks, rough framing lumber, or steel fixtures where cosmetics don’t matter, you might be fine with another striking tool and good technique.
Choosing the Right Mallet: Head Material, Hardness, and Weight
This is where people get tripped up. “Soft hits” is not the same as “lightweight.” A heavier mallet can deliver a lower-effort, more controlled strike because you don’t have to swing as hard.
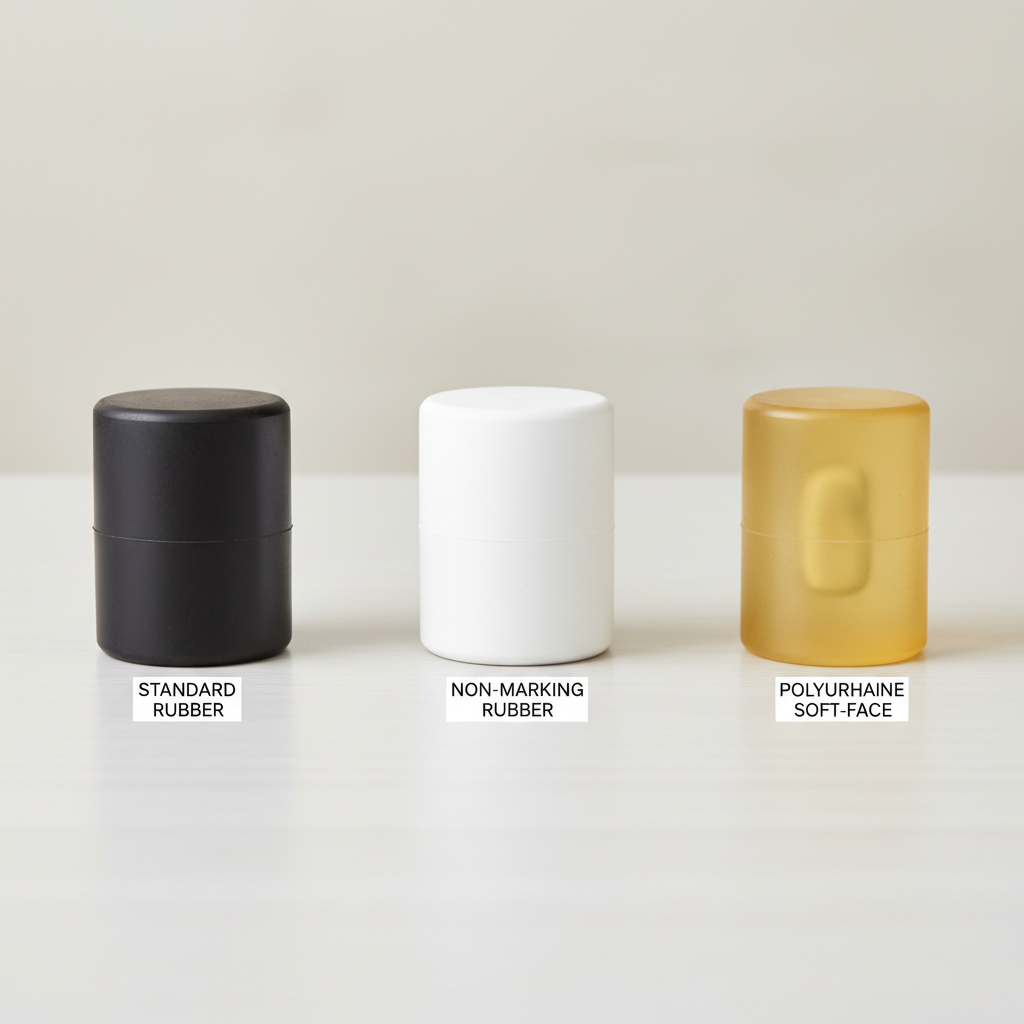
Head materials you’ll see (and what they’re good at)
- White/gray rubber: Often the go-to for non-marring work, decent grip on contact, good for seating joints and tapping trim.
- TPR / polyurethane-style faces: Usually tougher, less bounce, longer wear, often cleaner on smooth surfaces.
- Nylon faces (on soft-face hammers): Harder strikes, good for machinery alignment, can still mark very soft finishes.
- Rawhide or leather: Traditional option for delicate work, but can be inconsistent and not always “non-marking” on light surfaces.
Hardness and bounce
Softer heads reduce denting risk, but they can leave more rub marks if the face drags. Harder “non-marking” faces reduce smears and last longer, but they can telegraph impact if your surface is fragile. In practice, many shops keep two options: a softer head for seating and a firmer one for persuasion.
Use-Case Fit: A Practical Comparison Table
If you’re trying to match tool to task, this quick table usually clears things up faster than specs alone.
| Task | Recommended head | Why it works | Watch out for |
|---|---|---|---|
| Wood joinery seating | White/gray rubber (medium-soft) | Grippy contact, reduces denting | Wipe face often to avoid grit transfer |
| Laminate/LVP tapping block | Non-marking rubber (medium) | Gentle force, fewer scuffs | Don’t strike flooring directly |
| Automotive trim clips | TPR / polyurethane-style | Cleaner impact, less bounce | Too-hard faces can gloss-mark soft plastics |
| Light machinery alignment | Soft-face hammer with nylon/PU faces | More precise, durable faces | Confirm surface tolerance, consider a buffer |
| Tile setting (light taps) | Rubber mallet (soft) | Spreads impact, lowers chip risk | Too much force can still crack tile |
How to Get “Soft Hits” Without Losing Accuracy
Most frustration comes from the same pattern: you swing harder to compensate for softness, then you overstrike and misalign the part. The trick is to make the mallet do the work, not your wrist.
- Choke up on the handle: Grip closer to the head for short, controlled taps on alignment-sensitive parts.
- Let weight replace speed: A slower swing with a slightly heavier head often seats parts more predictably.
- Use a buffer when finishes matter: A clean scrap of cardboard, leather, or a wood block can reduce contact marks further, especially on high-gloss surfaces.
- Tap in sequence: For frames, flooring joints, or press-fit assemblies, move around the perimeter rather than hammering one corner repeatedly.
One more small habit that pays off: keep a rag nearby and wipe the face whenever you see dust build up. It sounds trivial, but it’s usually the difference between “non-marking” and “why is there a gray streak on my work.”
Common Mistakes That Make Non-Marking Tools Look Bad
A mallet rubber non marking choice can still disappoint if the setup is wrong. These are the issues that come up the most in real shops and job sites.
- Hitting the finished surface directly: Even a clean, light-colored head can burnish or dull a finish. When in doubt, strike a sacrificial block.
- Using a damaged face: Nicks and hard edges behave like little chisels. Replace the head or the tool when it starts chunking.
- Assuming white rubber equals “safe”: Some compounds still contain additives that can leave a faint trace on porous surfaces.
- Over-rotating the wrist: Glancing blows create scuffs; square contact reduces rubbing.
Maintenance and Safety: Small Checks That Prevent Big Headaches
Rubber mallets feel low-risk, but they still deserve basic safety discipline. According to CPSC, using the right tool properly and keeping it in good condition helps reduce injury risk with consumer products, and striking tools are a classic example.
- Clean the striking face: Warm water and mild soap often works, then fully dry. Avoid harsh solvents unless the manufacturer recommends them.
- Inspect the handle: Look for cracks, loose heads, or twisting. A head that shifts mid-swing can cause a miss or a pinch injury.
- Eye protection: When tapping near metal edges, fasteners, or brittle materials, chips can happen even with soft hits.
- Storage: Keep the mallet away from oils and direct heat, some rubbers harden or degrade faster when stored poorly.
If you’re using a mallet around sensitive electronics, medical equipment, or critical machinery alignment, it’s smart to follow your workplace procedure and consult a qualified technician when tolerances matter.
Key Takeaways Before You Buy or Swap Tools
- Non-marking is a goal, not a magic guarantee: surface type and cleanliness still decide the outcome.
- Match hardness to material: softer for delicate seating, firmer for cleaner impact on tougher surfaces.
- Control beats force: short strokes, square contact, and a tapping block prevent most cosmetic issues.
- Keep the face clean: embedded grit causes more marks than the rubber compound itself.
Conclusion: A Cleaner Hit Is Usually a Smarter Hit
A mallet rubber non marking tool earns its spot when your job ends with “leave it looking finished,” not “we’ll sand and repaint later.” Pick the head material and hardness for your surface, keep the face clean, and don’t be shy about using a buffer block when cosmetics are critical.
If you want one action to take today, wipe your mallet face and test a few taps on scrap that matches your real surface, it’s a quick reality check that prevents surprises once you move to the actual workpiece.
FAQ
What does “non-marking” mean on a rubber mallet?
Usually it means the head compound is designed to reduce dark rubber transfer. It does not always mean “zero marks” on every finish, because grit, heat, and surface texture still matter.
Can a non-marking rubber mallet damage wood or paint?
It can, especially on soft woods or fresh paint where pressure leaves a burnish mark. When the finish is delicate, use a clean buffer like cardboard or a wood block and keep strikes square.
Why is my white rubber mallet leaving gray streaks?
Most of the time it’s embedded dust or metal particles on the face, not the rubber color itself. Clean the head and check for small nicks that trap debris.
Is a heavier mallet better for soft hits?
Often, yes. A slightly heavier head can seat parts with less swing speed, which improves control. Too heavy can be risky on fragile materials, so it depends on what you strike.
Should I buy rubber, polyurethane, or a soft-face hammer?
For general trim and woodworking, non-marking rubber is common. For cleaner contact and longer wear, polyurethane-style faces often perform well. For mixed shop tasks and replaceable faces, a soft-face hammer can be more flexible.
Can I use a non-marking mallet on tile?
Light tapping for positioning is common, but tile can still crack from point loads or edge hits. If you’re unsure, follow the tile manufacturer guidance or ask a qualified installer.
How do I keep a mallet truly non-marring on finished surfaces?
Keep the face clean, avoid dragging blows, and strike a sacrificial block whenever possible. Testing on a matching scrap piece is the simplest way to confirm before committing.
If you’re trying to standardize your kit for clean assembly work, flooring installs, or finished wood projects, choosing a non-marking mallet with the right hardness and a face that stays clean will usually save time you’d otherwise spend on touch-ups and rework.